
Inbound Routes
This page is in essence, where an inbound call begins on the PBX. DIDs, CIDs, and combinations of the two instruct the system on where to route calls when they come in. You can route call to time conditions, directly to extensions, menus, or conference bridges. You can even block numbers from getting further than this module before the system hangs up on them.
Route List on right side of screen:
At the top right corner of the screen, you'll see a list of the DIDs, CIDs, and DID/CID combinations on the system. Clicking one will take you to that Incoming Route’s main settings page. The routes can be sorted and ordered in several manners. The options are as follows:
Add Incoming Route: Choosing this option will open a page for you to create a new incoming route rather than edit an existing route. This option does not affect the sorting/ordering of the list. All DIDs: This option will populate the list below with every route on the system.
User DIDs: This option will populate the list below with only the routes which have an extension as the destination.
General DIDs: This option will populate the list below with any routes that do not go directly to an extension. e.g. Time Condition, IVR, or Ring Group used as destination.
Unused DIDs: This option will populate the list below with any routes which do not have a destination. You cannot create a route without selecting a destination. However, once a route is created, you can choose the ‘Clear Destination & Submit’ option, and the route will appear under this section.
(toggle sort): This will appear next to the above option you choose (default: Add New Route). Clicking this option again will reverse the sort order for that section.
Example:
100
8888675309/ any CID
Blocked
Any DID / 8885555555
Main
805421414 / any CID
Inbound Route settings are displayed on the left side of the screen:
Delete Route <DID / CID>: This button will remove the route from asterisk. It will not affect other modules.
Edit Extension <ext#>: This link will only appear if the route has an extension as its destination. It will take you to the extension’s settings page.
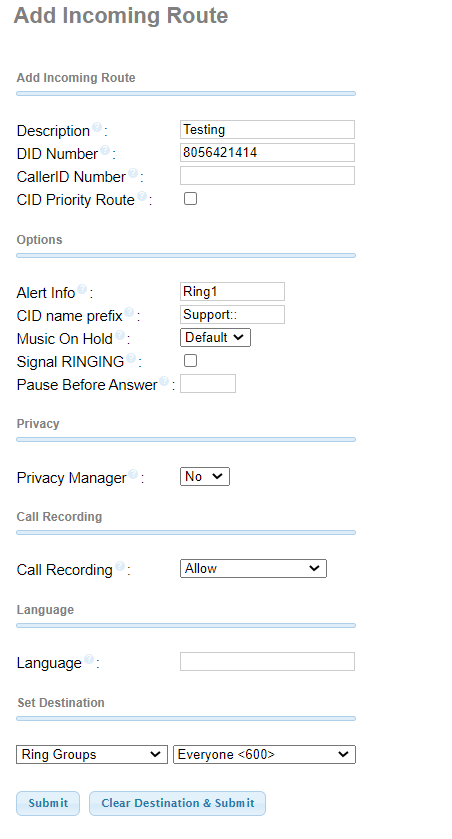
Edit Incoming Route
Description: (Default: <blank>) Simple label for the route for organizational purposes. Can be left blank.
DID Number: (Default: <blank>) When the trunk passes a DID through to the PBX, the system will attempt to match it to this field in any of the routes. If it matches and there are no other routes for this DID with a matching CID as well, it will use this one.
CallerID Number: (Default: <blank>) When the trunk passes a CID through to the PBX, the system will attempt to match it to this field in any of the routes. If a route matches this field and the DID dialed, this route will take precedence. In addition to standard dial sequences, you can also put “Private”, “Blocked”, “Unknown, “Restricted”, “Anonymous”, or “Unavailable” in order to catch these special cases if the telco transmits them.
CID Priority Route: (Default: unchecked>) If a DID number is not entered for a route, this option must be enabled for calls from this CID to be routed to the destination for this route. If not, the route for the DID dialed will be used.
Options
Alert Info: (Default: <blank>) This can be used to force a specific ringtone to be used by sip devices that are used by this route. E.g. Ring1, Ring2. Depends on hardware.
CID name prefix: (Default: <blank>) You can enter a string here that will be added to the beginning of the CallerID info that is passed to the SIP device. E.g. “Sales:” in this field with a caller ID of John Doe, will display “Sales: John Doe” on the phone display.
Music on Hold: (Default: <blank>) You can force call that come through this route to use a different hold music category than other calls.
Signal RINGING: (Default: <blank>) Whether to send “ringing” tones before the system lets the other side know that the call has been answered. Some providers and devices require RINGING to be sent before ANSWER. You’ll notice the need for this if you can send calls directly to a phone/extension, but if you send it to an IVR, it won’t connect the call.
Pause Before Answer: (Default: <blank>) This creates a delay before sending the call to the destination.
Privacy
Privacy Manager: (Default: No) If a call comes through this route without a valid caller ID, the caller will be prompted to enter their caller ID manually.
Max attempts: (Default: 3) The number of times the caller can attempt to enter a valid caller ID before the system ends the call.
Min Length: (Default: 10) The caller must enter at least this number of digits to register a valid caller ID.
Call Recording
Call Recording: (Default: Allow) This allows you to set the recording behavior for calls that come through this route.
Allow: Will honor “downstream” recording settings.
Record on answer: This will set the call to be recorded as soon as it is answered on an extension, regardless of extension settings.
Record Immediately: Recording begins as soon as the call reaches this route. The recording will include ringing, announcements, MoH etc. (Ringing not recorded when destination is an extension) Never: Calls will not be recorded, regardless of “downstream” settings.
Language: (Default: <blank>) Language code to change system recording language.
Language NOT FUNCTIONAL
Set Destination
Choose where to send the call once the route is selected. You must select a destination to create the new route successfully. If the route has already been created and you click on the ‘Submit
Submit: Create the route or submit changes.
Clear Destination & Submit: Remove the destination from this route, effectively blocking calls.