
Manage your profile and account
Your profile holds your name as it appears in the portal and in secure message notifications. You can also turn two-step verification or remote support on or off, download a copy of your messages, or leave your organization.
Change your name or phone number
-
Click your name or picture in the top-right corner, then click Edit Profile.
You can also go to Settings, then Profile, and click Open Profile.
- Change First name, Last name or Phone number. Both names are required; the phone number is optional and takes digits only (10 to 15).
-
Click Save changes.
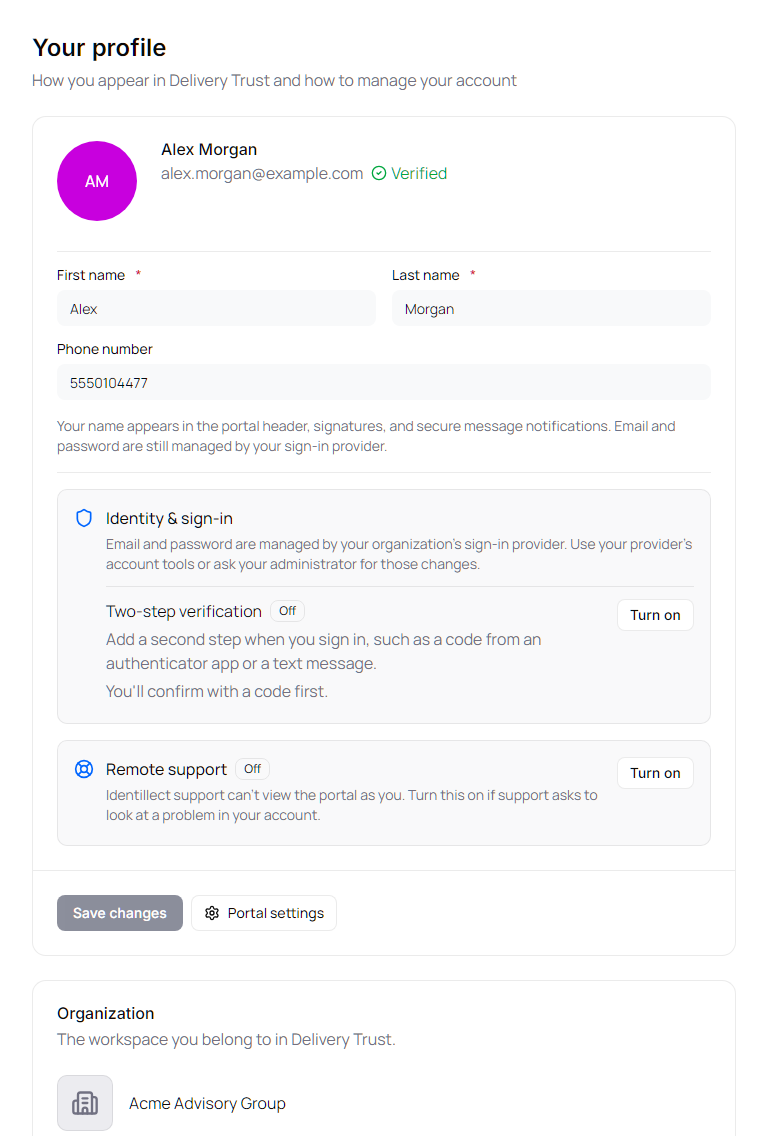
Your name appears in the portal header, in signatures and in secure message notifications. The portal shows "Profile updated" when your changes are saved.
Change your email address or password
Your email address and password are managed by your sign-in provider, not on the Profile page.
- To change your password, use Forgot password? on the sign-in page. See Sign in and out.
- If you sign in with Google or Microsoft, change your password with that provider.
- To change your email address, ask your business administrator or contact support.
Turn two-step verification on or off
Two-step verification, also called multi-factor authentication (MFA), adds a second step when you sign in, such as a code from an authenticator app or a text message.
- Open your profile (Edit Profile in your account menu).
- In the Identity & sign-in box, find Two-step verification. It shows On or Off.
- Click Turn on, or Turn off. To turn it off, read the message and click Turn off again.
- You're taken to the sign-in page to confirm with a code first. When you turn it on for the first time, follow the steps there to set up an authenticator app or a phone number for text messages.
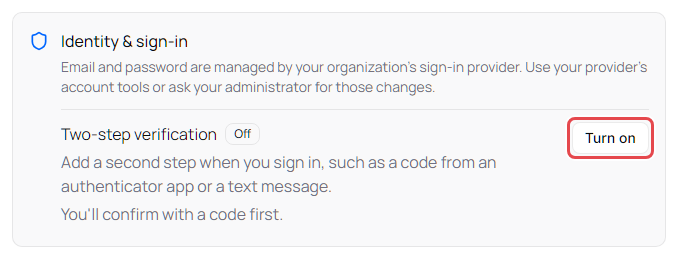
Back on your profile, the portal shows "Two-step verification is on." or "Two-step verification is off." when the change is saved.
- Required by your organization: your business administrator requires two-step verification, so there's no button and you can't turn it off. If you haven't set it up yet, you're asked to the next time you sign in with your password.
- Not set up yet: two-step verification is on, but you haven't set up an authenticator app or phone (for example, after your administrator reset it). You're asked to set it up the next time you sign in. Turn off doesn't ask for a code in this case.
- Turning it off removes your authenticator app or phone from your account. If you turn it on again later, you set it up from the start.
- If the portal shows "We couldn't confirm your code. Try again.", click the button again and enter a new code.
- Google or Microsoft sign-in: your organization's requirement doesn't apply to these sign-ins (that account's own security settings do). Two-step verification you turn on yourself applies to every sign-in, including Google and Microsoft.
- Lost your phone? Ask your business administrator to reset your two-step verification, or contact support.
Turn remote support on or off
Remote support lets Identillect support staff see the web portal the way you see it, so they can look into a problem with your account. It's off unless you turn it on. If you signed up your organization, it was turned on for you.
- Open your profile (Edit Profile in your account menu).
- Below the Identity & sign-in box, find Remote support. It shows On or Off.
- Click Turn on, or Turn off.

The portal shows "Remote support is on." or "Remote support is off." when the change is saved.
- While remote support is on, support staff can make changes for you, such as fixing a setting, but they can't send mail as you or change your billing. Every visit is recorded, and if you belong to an organization, its administrators can see each visit in the access log.
- Turning it off takes effect right away, even if someone from support is viewing your portal at that moment.
- Only you can change this setting. Support staff can't turn it on for you.
- It's the same setting as Remote Support in the classic web portal, so changing it in one portal changes it in the other.
Download a copy of your messages
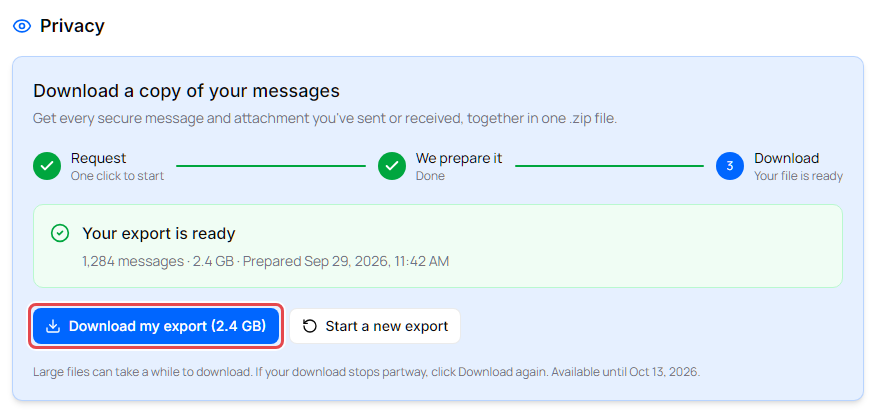
You can export the secure messages you've sent and received, with their attachments, as one zip file. It takes two visits: first you ask for the export, then you come back to download it once it's ready. The steps at the top of the card (Request, We prepare it, Download) show where your export is.
- Click the gear icon (Open settings) in the top-right corner, then go to the Privacy section.
-
Under Download a copy of your messages, click Prepare my export.
Preparing your file takes a few minutes, or a few hours for a very large mailbox. You don't need to wait for it: you can leave the page or close your browser, and the export keeps going. Come back to Settings > Privacy anytime to check on it.
-
When the card says Your export is ready, click Download my export. Your whole export downloads as one zip file. A large mailbox can be many gigabytes, so the download can take a while.
| What the card shows | Meaning |
|---|---|
| You're #3 in line or Waiting to start | Your export is in line and starts automatically when it's your turn (see Waiting in line below). |
| Preparing your export… | The bar shows how far along it is, for example "2,573 of 5,732 messages". At the end, it shows Finishing up — preparing your download… while your file is put together. For a very large mailbox, this can take a few minutes. |
| Starting again… | The export had to restart, for example during maintenance. You don't need to do anything. |
| Your export is ready | Click Download my export. |
| We couldn't finish your export | Click Try again to start over. If it keeps happening, contact our support team. |
Good to know:
- If a download stops partway, or the download link stops working, click Download my export again.
- You have one export at a time. Start a new export replaces the one you have, so download your current file first. The portal asks you to confirm before it replaces it.
- To stop an export that's waiting or being prepared, click Cancel export, then confirm.
- If you ask for an export from a different browser while one is already waiting or being prepared, the portal shows "You already have an export in progress." and shows that export instead.
- You can request up to 10 exports in an hour. If you reach the limit, the portal tells you how long to wait, for example "You've reached the limit for export requests. Try again in about 12 minutes."
- Your file stays available to download for 14 days after it's ready, and the card shows the date, for example "Available until Oct 20, 2026." After that, it's removed automatically.
- Data export is available only when you belong to an organization.
What's in your export
When you unzip the file, you'll find one folder for each conversation, named with the date of its first message and its subject, for example 2026-10-06 - Q3 plan. Each folder holds:
- A PDF of the conversation with the same name as the folder. It looks like a conversation printed from the portal: each message with its sender, recipients, date and time, and text, plus the pictures in the messages.
- The files attached to the messages in that conversation.
Dates and times use the time zone of the computer you started the export from.
Some senders limit what you can keep:
- If the sender turned off downloading or printing a message for you, the PDF shows who sent it, to whom and when, with "Downloading has been disabled by the sender." or "Printing has been disabled by the sender." instead of the text.
- If the sender turned off downloading attachments, those files aren't in the folder. The PDF still lists them, with a note.
- Messages that have expired aren't included.
Waiting in line
When a lot of exports are being prepared at the same time, new ones wait in line and start in the order they were requested.
- While your export waits, it shows your place, for example You're #3 in line. Your place moves up as the exports ahead of yours finish.
- You're next in line means your export starts next.
- You don't need to do anything. Your export starts on its own when it's your turn, and you don't lose your place if you leave the page or close your browser.
Leave your organization
If you no longer work with the organization, you can remove yourself from it.
- Open your profile (Edit Profile in your account menu).
- In the Organization card, click Leave organization.
- Read the message and click Leave organization to confirm, or Back to cancel.
Important: Leaving is permanent. You lose access to the organization's workspace, and any add-ons assigned to you go back to the organization. If you're the only administrator, make someone else an administrator first. To rejoin, you need a new invitation, or contact support to be added back as an administrator.