
Set an enterprise policy for secure messages
An enterprise policy sets sign-in requirements and the default security and authentication options for secure messages, for everyone in your organization. Lock a message setting to stop users from changing it when they compose. If you're a business administrator, you manage the policy on the Enterprise policy tab.
Require two-step verification
Two-step verification, also called multi-factor authentication (MFA), adds a second step when people sign in: a code from an authenticator app or a code sent by text message.
- Click your name or initials in the top-right corner, click Organization, then open the Enterprise policy tab.
- Under Sign-in security, at the top of the tab, turn on Require two-step verification.
- Click Save changes at the bottom of the page, then click Save changes again in the message that asks you to confirm.
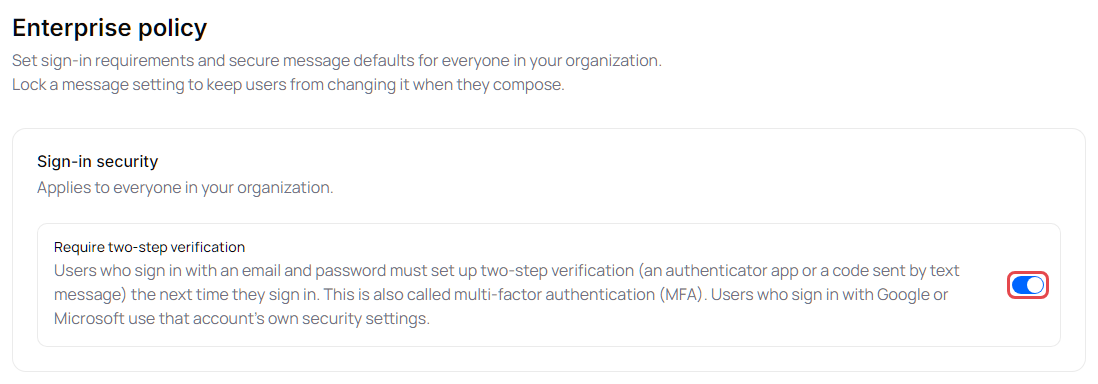
Everyone in your organization who signs in with an email address and password is asked to set up two-step verification the next time they sign in (see Sign in and out). The change reaches everyone within a few minutes. People who sign in with Google or Microsoft use that account's own security settings instead.
While it's required, people see Required by your organization under Two-step verification on their profile and can't turn it off. See Manage your profile and account.
If you turn the requirement off, people who already set up two-step verification keep it on until they turn it off in their profile.
If someone loses their phone or can't get codes, reset their two-step verification from the Users tab. See Invite and manage users.
Note: Two-step verification protects how your team signs in to Delivery Trust. It isn't the SMS passcode method or the MFA Authentication add-on below, which ask recipients of your secure messages to prove who they are.
How defaults and locks work
Each setting on the tab has two controls:
- Default: the value secure messages start with.
- The lock switch (next to the padlock): when it's on, users can't change the setting.
When a setting is locked, its switch in the compose window is greyed out and shows "Required by your administrator" (locked on) or "Disabled by your administrator" (locked off). In the user's Settings, locked settings show a padlock and "Settings with a lock are managed by your organization." See Why is an option greyed out? and Set your default security settings.
Set authentication defaults
- Click your name or initials in the top-right corner, click Organization, then open the Enterprise policy tab.
-
Under Authentication defaults, turn on the Default switch for the method recipients should use to prove who they are. Only one method can be the default; turning one on turns the others off.
| Method | Recipient proves identity with | |---|---| | Last 4 of mobile | The last four digits of their mobile number | | Last 4 of business phone | The last four digits of their business phone number | | Postal code | A postal code | | Security question | A custom question and answer | | SMS passcode | A one-time code by text message. Shown only if your organization has the MFA Authentication add-on. |
-
To require that method on every secure message, turn on its lock switch. An unlocked default only preselects the method: users still decide whether to require authentication and can pick another method.
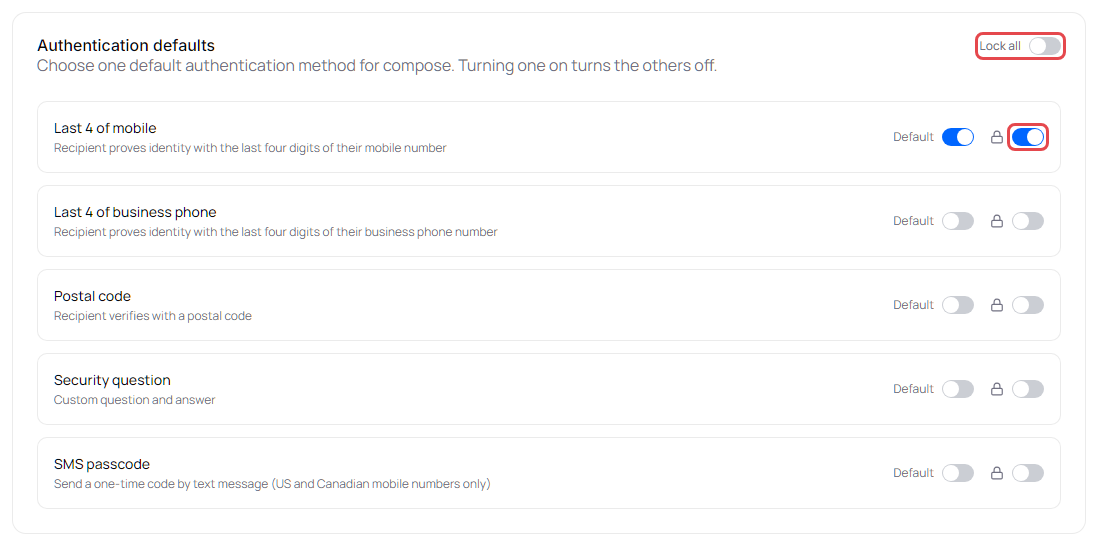
Lock all, at the top right of Authentication defaults, locks (or unlocks) every setting on the page at once, including the ones under Additional security controls.
Set additional security controls
Under Additional security controls, set the Default for each option and lock the ones users must not change. For what each option does for the recipient, see Additional security controls.
| Setting | Default choices |
|---|---|
| Disable printing | On or off |
| Disable forwarding | On or off |
| Disable email download | On or off |
| Disable attachment download | On or off |
| Force recipient to web portal | On or off |
| Notify when read | On or off |
| Enforce email integrity | On or off. Shown only if your organization has the Email Integrity add-on. |
| Expires on | No limit, 1 day, 2 days, 7 days or 30 days |
| View limit | Unlimited, 1 view, 3 views, 5 views or 10 views |
Control deleting from Trash
Under Mailbox, Allow users to delete messages from Trash applies to everyone in your organization. When it's off, users can still move messages to Trash and restore them, but "Delete forever" is turned off. See Delete and restore messages.
Save your policy
Click Save changes at the bottom of the page. If you turned Require two-step verification on or off, confirm it in the message that opens. The portal confirms "Enterprise policy saved".
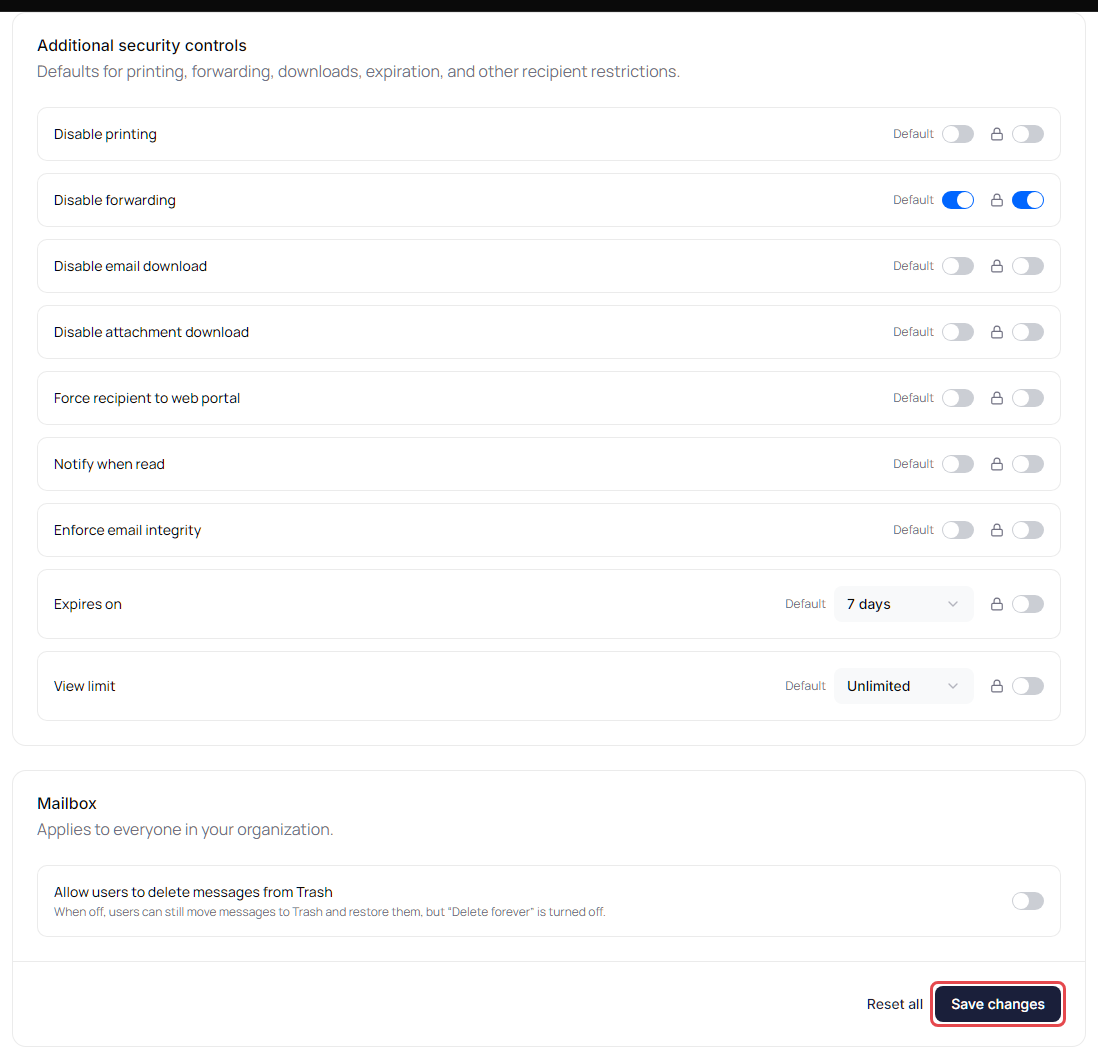
To start over, click Reset all. Every setting goes back to off and unlocked, Expires on to No limit and View limit to Unlimited, deleting from Trash is allowed again, and two-step verification is no longer required. Click Save changes to apply it.