
Invite and manage users
If you're a business administrator, the Users tab lists everyone in your organization and every pending invitation. From there you invite people (one at a time or from a CSV file), change roles, reset passwords and two-step verification, and suspend or remove members.
The Users tab
Click your name or initials in the top-right corner, click Organization, then open the Users tab.
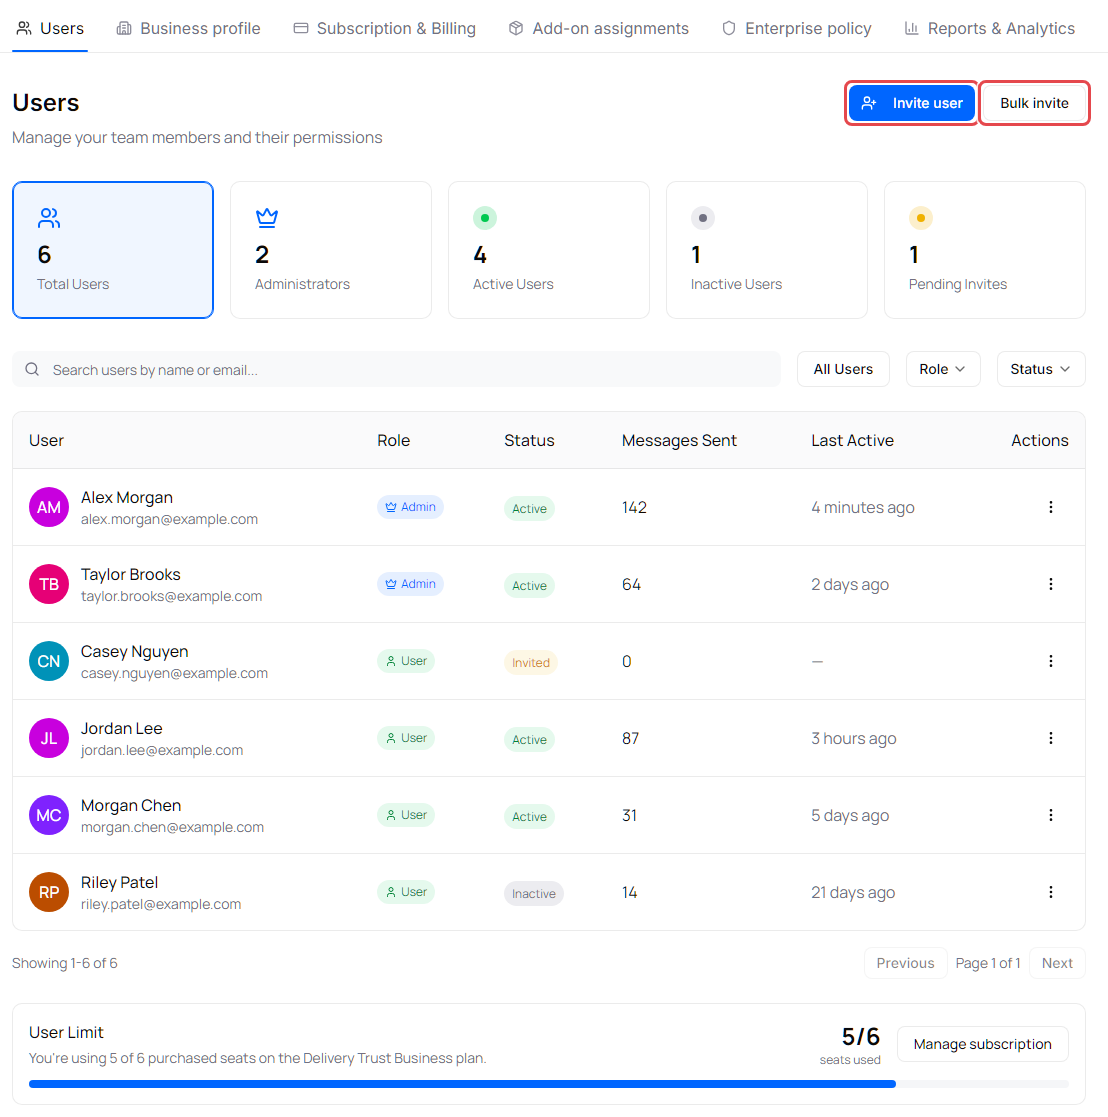
- The cards at the top count Total Users, Administrators, Active Users, Inactive Users and Pending Invites. Click a card to show only those people; click it again to show everyone.
- Use Search users by name or email..., or the Role and Status filters. All Users clears the filters.
- Each row shows the person's role (Admin or User), status (Active, Inactive or Invited), Messages Sent and Last Active.
- The User Limit box at the bottom shows how many of your purchased seats are in use. Active members and pending invitations each use a seat; inactive (suspended) members don't. Click Manage subscription to add seats. See View your plan and change your subscription.
Invite a user
- Click Invite user, on the right of the Users heading.
- Enter the person's Email, First name and Last name.
- Optional: under Add-ons (optional), click each add-on to give this person. Each add-on shows how many of its licenses are assigned; one that has no licenses left can't be selected.
-
Click Send invitation.
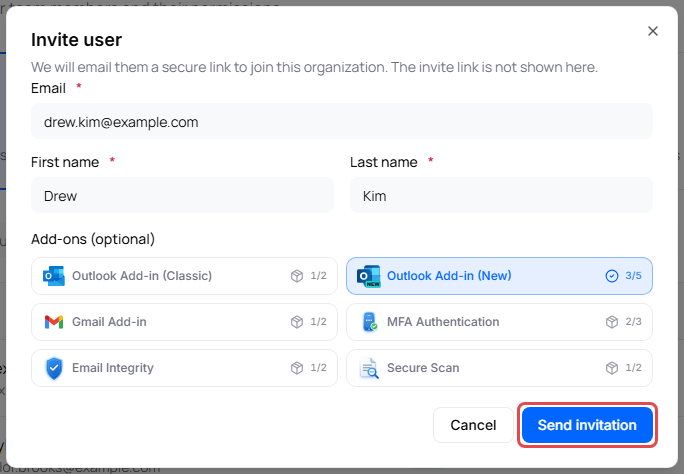
The person receives an email with a secure link to join your organization, and the portal tells you when the link expires. They appear in the list as Invited until they accept. To see what they experience, read Accept an invitation to join an organization.
- If the address belongs to a current member, the window says "This person is already a member."
- If it belongs to a suspended member, unsuspend them instead (see below).
- If an invitation is already pending, sending again refreshes the invite link.
Invite many users from a CSV file
- Click Bulk invite, next to Invite user.
- Click Download CSV template to get a file with the right columns (optional).
-
Fill in one person per row. The file needs these three columns:
| Column | Example | |---|---| | First Name | Jordan | | Last Name | Lee | | Email | jordan.lee@example.com |
A file can have up to 500 rows and be up to 5 MB. Blank rows are ignored.
- Click Choose CSV file and select your file.
- Check the preview. It counts the rows that are Ready to invite and the rows that Will be skipped, and lists the first rows with their status. Rows in red are skipped, for example a duplicate email in the file or someone who is already a member.
- Optional: choose add-ons to give everyone in this batch.
-
Click Send (the button shows how many invitations will go out).
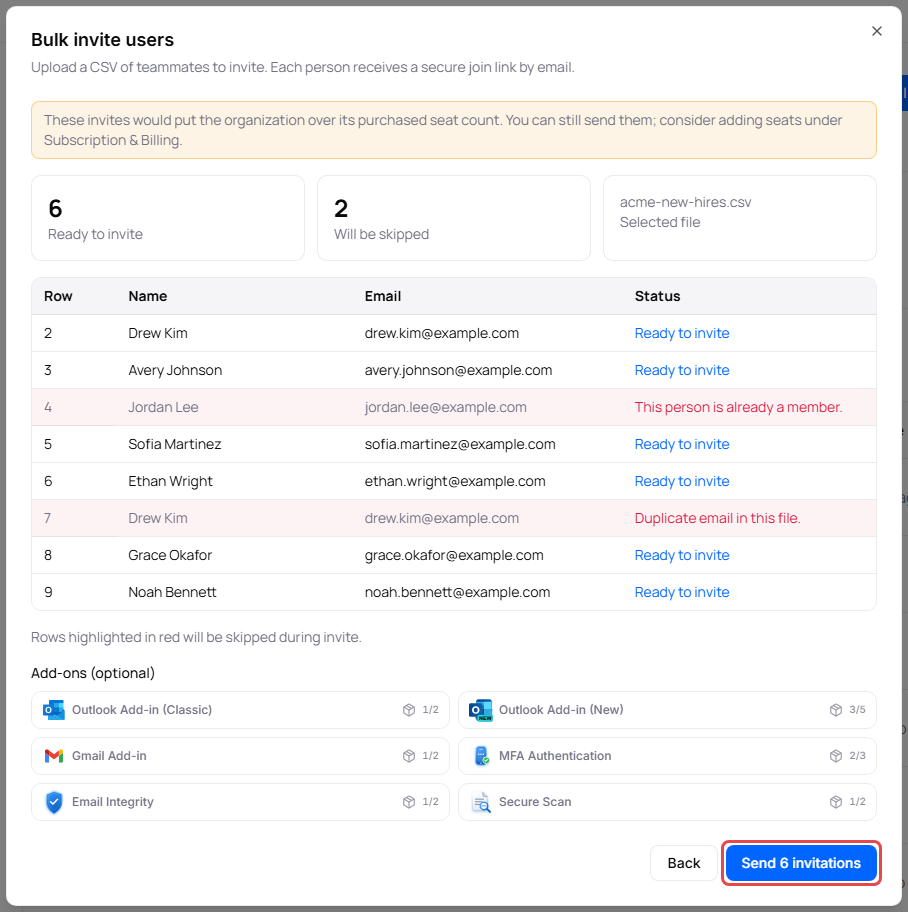
When the import finishes, you see how many invitations were Sent, Refreshed, Skipped and Failed, with the reason for each problem row. Click Done.
Note: If the invitations would put your organization over its purchased seats, the preview warns you. You can still send them; add seats under Subscription & Billing.
Manage a user
Click the three-dot menu at the end of the user's row. The options depend on the person's status.
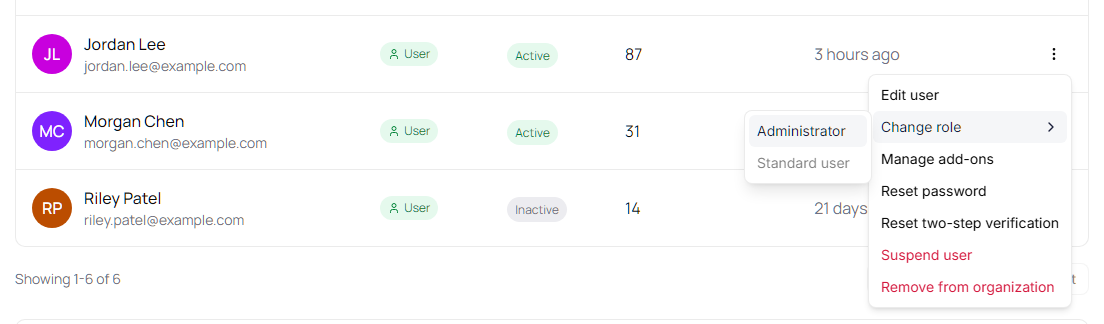
| Option | What it does |
|---|---|
| Edit user | Opens the Edit user page, where you can change the person's First name, Last name, Phone number and Email, then click Save changes. |
| Change role | Choose Administrator (can open the Organization pages) or Standard user. |
| Manage add-ons | Choose which add-ons this person has. See Assign add-ons to users. |
| Reset password | Sends the person a password reset email. Click Send reset email to confirm. |
| Reset two-step verification | Removes the person's authenticator app or phone, for example when they lose their phone. If two-step verification is on for them, they set it up again the next time they sign in. Click Reset two-step verification to confirm. |
| Suspend user | Blocks the person from signing in, marks them Inactive and releases their add-ons to the organization. |
| Unsuspend user | For an inactive person: lets them sign in again and marks them Active. Their add-ons aren't restored automatically. |
| Remove from organization | Permanently removes the person from your organization and releases their add-ons. To rejoin, they need a new invitation or help from support. It doesn't block their sign-in. |
| Cancel pending invite | For an invited person: cancels the invitation. They need a new invite to join. |
Each of these asks you to confirm; click Back to change your mind. You can't suspend or remove yourself. To require two-step verification for everyone, see Set an enterprise policy for secure messages.
Tip: When you change someone's email on the Edit user page, Send verification email (default when email changes) is selected so they confirm the new address. The Edit user page also has the Suspend user and Remove from organization buttons.