
Compose and send a secure message
Every message you send from the web portal is a secure message: it's encrypted, and your recipients open it through a secure link. You choose who can read it and how they prove who they are before you send.
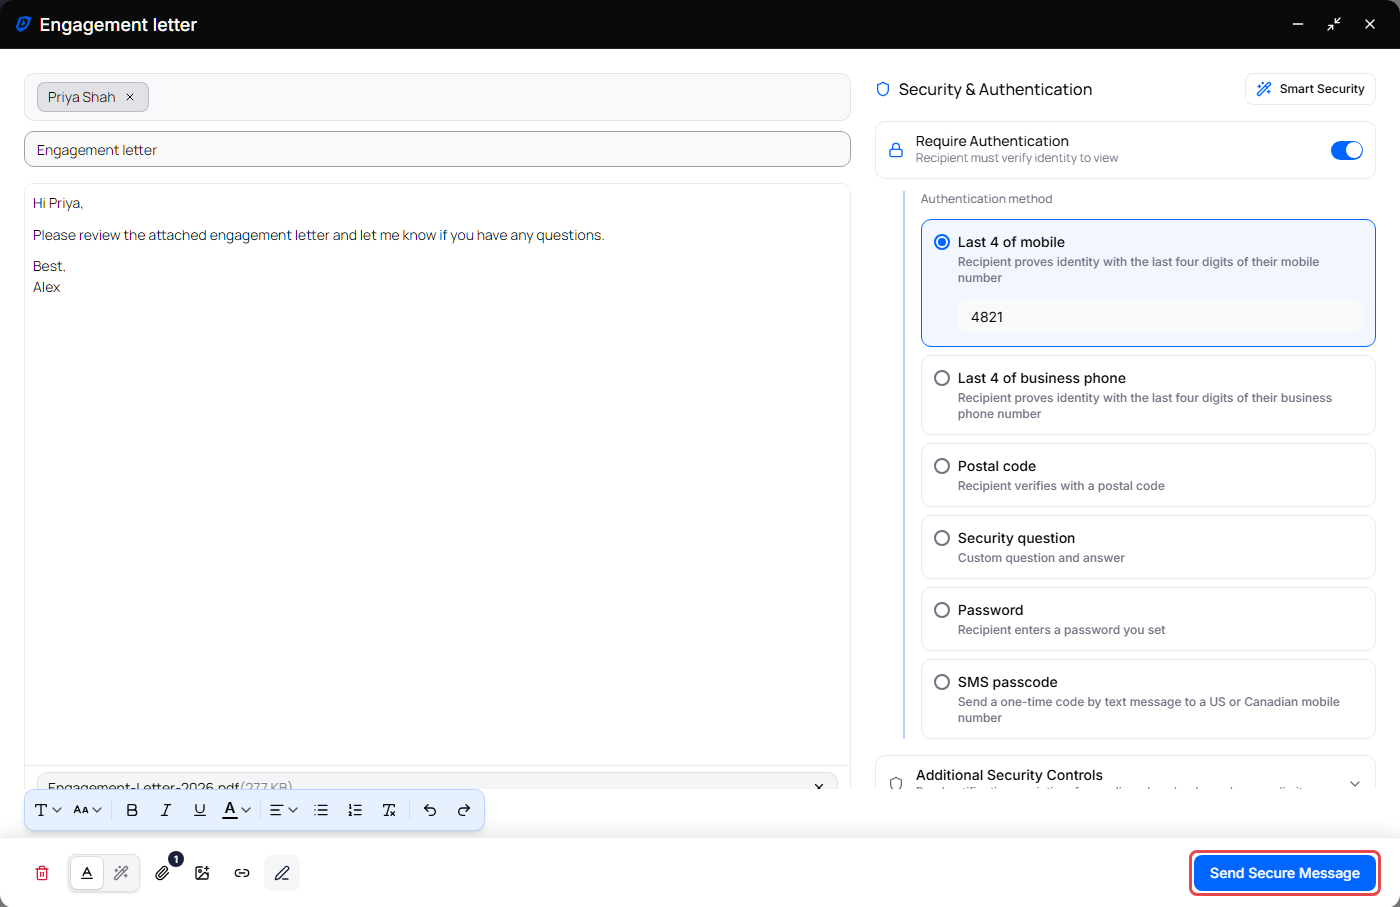
Write and send a message
- Click Compose at the top of the folder list on the left. The New Secure Message window opens. Once you type a subject, the subject replaces that title.
-
Click To and type an email address. Press Enter or type a comma to add it.
- As you type, matching contacts appear below the field. Use the arrow keys and press Enter, or click a contact.
- To add copy recipients, click Cc or Bcc on the right of the To field.
- Everyone on the message sees the To and CC recipients. BCC recipients are hidden from everyone else: only you see them, on a Bcc line when you open the message in Sent.
- You can add up to 50 recipients in total across To, CC and BCC.
- Type a Subject.
- Write your message in the box below the subject. To format text (bold, lists, colors and more), click Show formatting at the bottom of the window.
- Check the security settings in the Security & Authentication panel. Your defaults are already filled in. See Require recipients to authenticate and Additional security controls.
- Click Send Secure Message in the bottom-right corner. In a narrow window the button just says Send.
The window closes and Sending... appears at the bottom of the screen, then Sent. Click View message to open the message in your Sent folder.
Tip: Not sure which settings to use? Click Smart Security at the top of the security panel. See Let Smart Security suggest settings.
The toolbar at the bottom of the window

| # | Button | What it does |
|---|---|---|
| 1 | Discard draft (trash can, far left) | Deletes this draft. |
| 2 | Show formatting (A) | Shows or hides the formatting toolbar. |
| 3 | Help me write (wand) | Opens the AI writing assistant. See Write and refine messages with AI. |
| 4 | Add attachment (paper clip) | Attaches files. The small dark badge on the paper clip shows how many files are attached. |
| 5 | Insert inline image | Places a picture inside the message text. |
| 6 | Insert link | Select some text, click the button and type the web address in the Enter URL box. On text that's already a link, the button removes the link. |
| 7 | Signature (pen) | Turn Include signature on or off, or click Manage signature to edit it. See Set up your email signature. |
Point to a button to see its name.
Attach files
- Click Add attachment and choose one or more files, or drag files from your computer onto the compose window.
- Each file shows a progress bar while it uploads. Wait for the uploads to finish before you send.
- You can add up to 20 files at a time. If you add more, the extra files aren't attached and the portal says how many were left out. Add the rest once the first files finish uploading.
- If you attach two files with the same name, the second one is renamed, for example
Invoice (2).pdf.
For more about file limits, see Attachment and download limits.
The compose window
Use the buttons in the top-right corner of the window:
- Minimize: shrinks the message to a bar at the bottom of the screen so you can keep reading mail. Click the bar to continue.
- Full screen / Exit full screen: switches between a large centered window and a smaller window in the corner of the screen.
- Close: saves the draft and closes the window.
In full screen, the security settings are on the right. In the smaller corner window, click the Security tab next to Compose to see them. On a phone, tap Security settings below the message.
To choose how new messages open, go to Settings and pick Fullscreen or Corner Window under Default compose window. See Appearance and notification settings.
Drafts
The portal saves your message to Drafts automatically while you write. The window title briefly shows Draft saved.
- To pick up a draft later, open Drafts, select the message, and click Continue editing. Recipients come back in the field you put them in: To, CC or BCC. When you send it, the portal goes back to your Drafts list. Click View message in the Sent notice to open the message in your Sent folder.
- To delete a draft, click Discard draft (the trash can in the bottom-left corner). Click Undo in the Draft discarded message if you change your mind.
- If the portal can't reach the server, the window title shows Not saved. The portal keeps trying. If you close the window while it can't save, the portal asks whether to Keep editing or Close anyway.
If the message doesn't send
| Message | What to do |
|---|---|
| At least one recipient is required. | Add a recipient. |
| Maximum of 50 recipients allowed. | Remove recipients, or send separate messages. |
| Send without subject or body? | Click OK to send anyway, or Cancel to add a subject or message. |
| Complete authentication settings | Fill in the verification details listed in the message, such as a mobile number or password. See Require recipients to authenticate. |
| Finishing attachment uploads | The portal sends as soon as your files finish uploading. Click Cancel send to stop. |
| Please enter a valid email address | Check the address for typos. |
If sending fails after you click Send Secure Message, the portal shows Could not send your message and reopens your message with the reason at the top (Send failed: …). Nothing is lost: fix the problem and send again.
If Send Secure Message is greyed out, point to it to see why. See Why are some options greyed out?