
Require recipients to authenticate
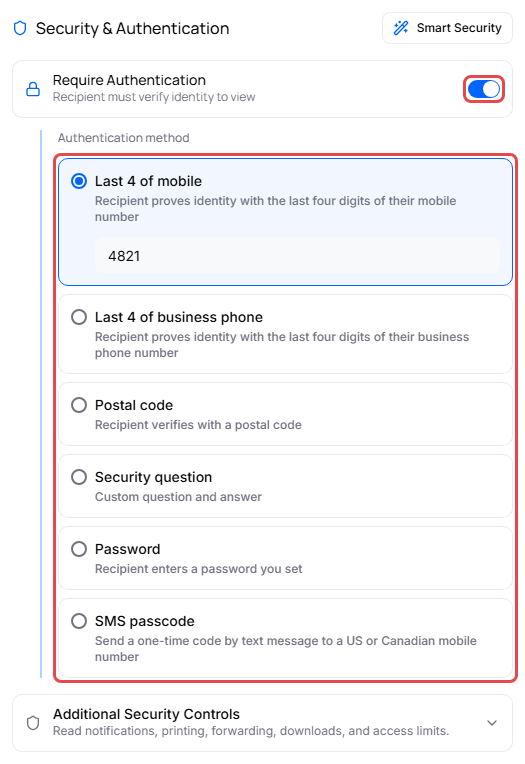
Turn on Require Authentication to make recipients prove who they are before they can read your secure message. You choose the method: a one-time text message code, details only the recipient knows, or a password or question you set.
Turn on authentication
- In the compose window, find the Security & Authentication panel. In full screen it's on the right. In the smaller corner window, click the Security tab. On a phone, tap Security settings.
- Turn on Require Authentication ("Recipient must verify identity to view").
-
Under Authentication method, click the method you want, then fill in the box that appears under it.
- Finish your message and click Send Secure Message.
Your recipient sees the questions when they open the message. See Open a secure message.
Authentication methods
| Method | What you enter | What the recipient does |
|---|---|---|
| Last 4 of mobile | The last 4 digits of the recipient's mobile number | Types the last 4 digits of their mobile number. |
| Last 4 of business phone | The last 4 digits of the recipient's business phone number | Types the last 4 digits of their business phone number. |
| Postal code | The recipient's postal code (3 to 12 letters, numbers, spaces or hyphens) | Types their postal code. |
| Security question | A question and its answer | Types the answer to your question. |
| Password | A password of at least 4 characters | Types the password. Share it with them another way, such as by phone. |
| SMS passcode | The recipient's mobile number (10 to 15 digits, numbers only, not starting with 0) | Receives a one-time code by text message and types it in. Requires the MFA Authentication add-on. |
Important: You can't change the verification details after you send. Double-check them before you click Send Secure Message. If they were wrong, send a new message.
If you click Send Secure Message with a missing or invalid value, the portal shows Complete authentication settings and lists what to fix.
Fill in details from your contacts
If the recipient is one of your contacts, the portal fills in blank verification boxes for you: Last 4 of mobile from the contact's mobile number, Last 4 of business phone from their business phone number, Postal code from their business postal code, and, with the MFA Authentication add-on, the SMS passcode number from their mobile number. It never overwrites something you typed. See Manage contacts.
Several recipients
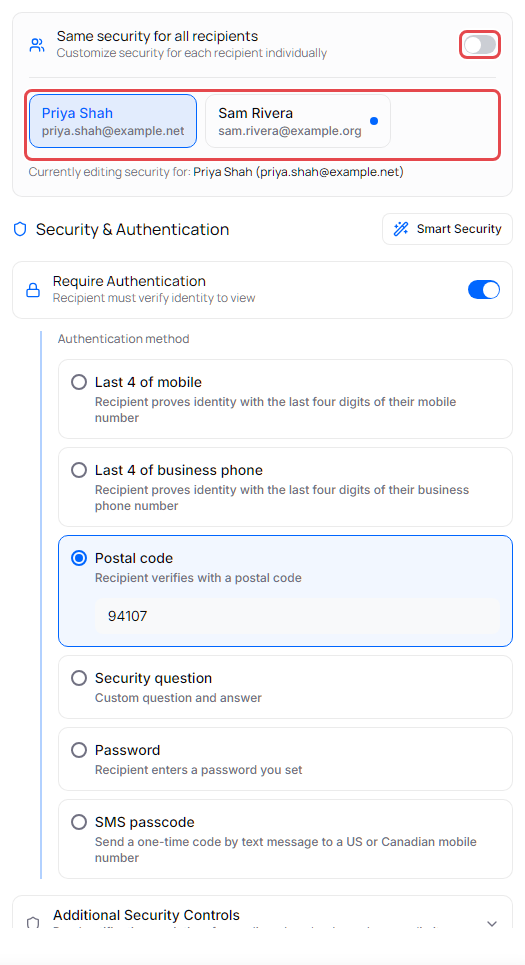
When a message has more than one recipient, Same security for all recipients appears at the top of the security panel. It's on by default.
- On: every recipient gets the same settings. Only Password and Security question are offered, because a phone number or postal code is different for each person.
- Off: you set security for each recipient separately, which also lets you use SMS passcode, Last 4 of mobile, Last 4 of business phone and Postal code.
To set security for each recipient:
- Turn off Same security for all recipients.
- Click a recipient's name under the switch. Currently editing security for: shows who you're editing.
- Choose the method and fill in the details for that person.
-
Repeat for each recipient. A blue dot marks recipients with their own settings. If you try to send with details missing, those recipients turn red.
When a method is missing or greyed out
- SMS passcode appears only if you have the MFA Authentication add-on, and only when you set security for one recipient at a time. See Assign add-ons to users.
- Your organization's administrator can require a method, turn methods off, or keep you from turning off Require Authentication. Point to a greyed-out option to see Required by your administrator or Disabled by your administrator. See Why are some options greyed out?